Comments
You can use your Mastodon or Fediverse account to reply to this toot!
 F1RUM
F1RUM
updated on 2022-11-02
If you are a HF digimode user, you have everything you need to send emails through the Winlink gateways. The Amateur Radio Safety Foundation runs the Winlink service and offers radio amateurs a mailbox associated with their callsign in the form CALLSIGN@winlink.org You can create your mailbox by following the instructions on their website, right column. In short, you can create your account by logging in once without a password. You will then receive an email with your password. I advise you to do it with Pat in telnet mode (see below).
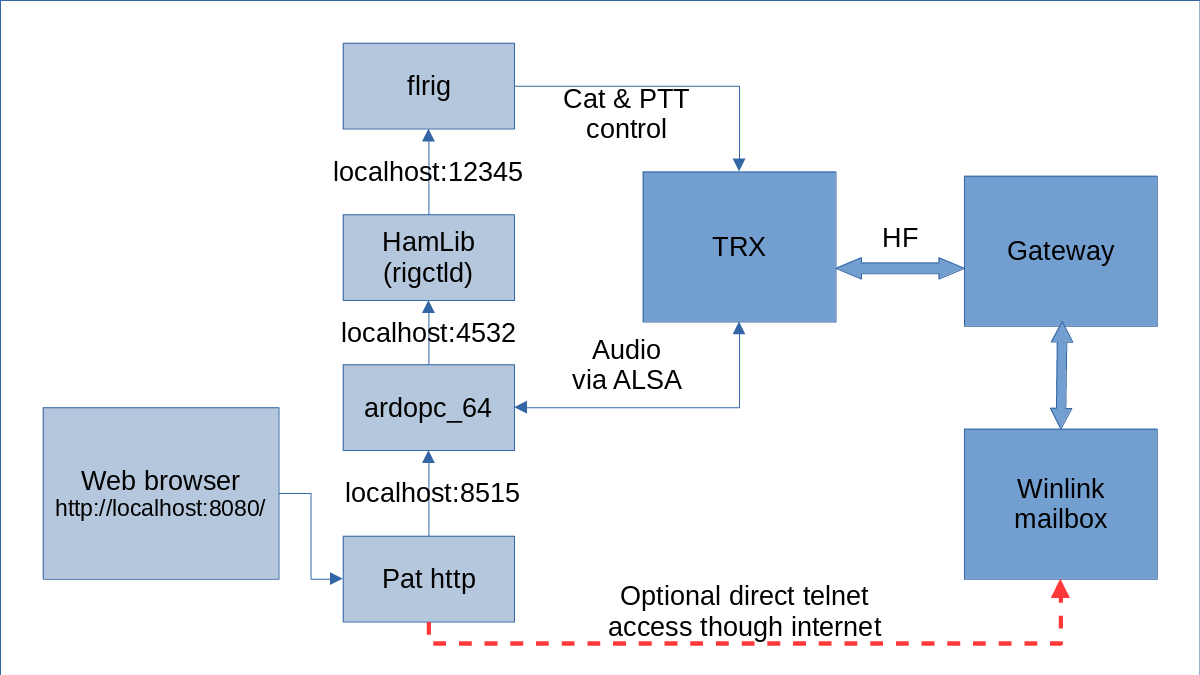
It took me a while to understand the principle of operation and the tools to use and their interactions. So I made a diagram to resume that.
This configuration is the most complete for a use case under GNU/Linux. I decided to use flrig to drive the transceiver because it seems to me easier to configure flrig graphically, if you know fldigi, rather than HamLib and its command line program rigctld. If you know rigctld, you won’t need flrig.
In summary, pat provides a web interface and uses ardopc software which encodes and decodes Ardop frames and control the transceiver through Hamlib. The latter can drive the TX directly (rigctld -m XX where XX is the model number of your TX given by the rigctld -l list) or use flrig (rigctld -m 4).
Depending on your Linux distribution, use the tools at your disposal to install the following software:
sudo apt-get install flrig libhamlib-utils
sudo wget -O /usr/local/bin/ardopc64 "http://www.cantab.net/users/john.wiseman/Downloads/ardopc64"
sudo chmod +x /usr/local/bin/ardopc64
wget -O /tmp/pat_0.13.1_linux_amd64.deb /tmp/ "https://github.com/la5nta/pat/releases/download/v0.13.1/pat_0.13.1_linux_amd64.deb"
sudo dpkg -i /tmp/pat_0.13.1_linux_amd64.deb
sudo apt install -f # pour les dépendances éventuelles
sudo apt-get install flrig libhamlib-utils
sudo wget -O /usr/local/bin/ardopc "http://www.cantab.net/users/john.wiseman/Downloads/Beta/ardopc"
sudo chmod +x /usr/local/bin/ardopc
wget -O /tmp/pat_0.13.1_linux_i386.deb /tmp/ "https://github.com/la5nta/pat/releases/download/v0.13.1/pat_0.13.1_linux_i386.deb"
sudo dpkg -i /tmp/pat_0.13.1_linux_i386.deb
sudo apt install -f # pour les dépendances éventuelles
Install these packages :
Install these AUR packages :
I will not go into detail, the objective is to be able to drive your transceiver with this software.
Check that the XMLRPC port configured in the Configure / Server menu is set to 12345. Start flrig to wait for instructions.
If you are using flrig, it is very easy to use.
Open a terminal and run the following command, it allows you to see in detail the errors and activities of the software. This can be useful in case of problems:
rigctld -m 4 -vvvv
If you need detail to connect directly your TX without flrig:
rigctld -l
rigctld -h
It is necessary to determine the card recognised under ALSA that is used to connect the audio input and output of your transceiver.
Use the following commands to list the recording and playback sound cards:
arecord -l
aplay -l
The card and device number gives the settings to be used with ardopc. For example:
card 1: PCH [HDA Intel PCH], device 3:
it means you have to use hw:1,3 or plughw1,3 (depending on the type of device, one will work better than the other)
We then launch ardopc or ardopc64 if 64 bits with the tcp 8515 port (default), then the recording sound card (RX to PC) followed by the reading sound card (PC to TX):
ardopc64 8515 hw:1,3 hw:1,3 # depending of your devices
If ardopc is complaining and indicating an incompatible sample problem, you may need to create a text file by adapting the affected device:
echo 'pcm.ARDOP {type rate slave {pcm "hw:1,3" rate 48000}}' > ~/.asoundrc
then restart ardopc64 as seen above.
We need to configure pat.
pat configure
In this file the following elements have to be filled in:
Here the … indicates parameters that are not touched:
{
  "mycall": "YOURCALLSIGN",
  "secure_login_password": "",
  "auxiliary_addresses": [],
  "locator": "JN25hc",
  ...
  "hamlib_rigs": {
    "myrig": {"address": "localhost:4532", "network": "tcp"}
  },
  ...
  "ardop": {
    "addr": "localhost:8515",
    "arq_bandwidth": {
      "Forced": false,
      "Max": 500
    },
    "rig": "myrig",
    "ptt_ctrl": true,
    "beacon_interval": 0,
    "cwid_enabled": true
  },
...
}
We launch pat to work via Ardop and telnet (for the first mail to be received, we will use telnet via internet to be sure to receive the mail containing the password)
pat --listen "ardop,telnet" http
And we connect to the pat web interface with the following address http://localhost:8080/
In Action menu - Connect, choose telnet
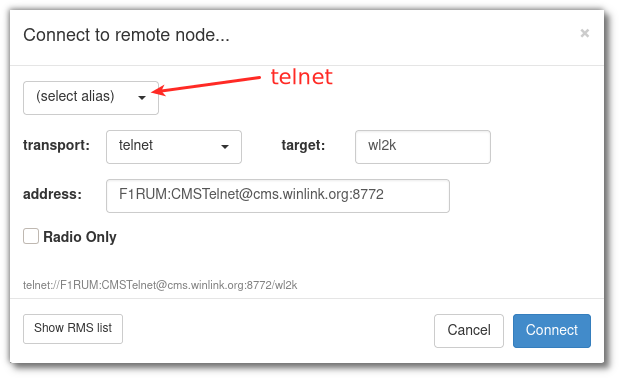
Then in the Inbox tab, we should have the 1st email containing the password and the instructions to validate the account. I have doubts about the order in which I did the account validation… if someone wants to give me the procedure, I will include it in this tutorial.
Once you have the Winlink password, remember to set it by quitting pat (Ctrl+C) and relauching “pat configure”, in the “secure_login_password” parameter. Relaunch pat –listen “ardop,telnet” http
It is time to connect to HF. It is not easy to get a connection to a gateway. Locate in the map of active gateways on the Winlink.org site by ticking the circle in front of Ardop the one that seems to be the most reachable according to the band, the distance, the propagation…
From Pat’s web interface, click on Action / Connect / Show RMS List. Click on the gateway of your choice, your TX should switch to the indicated frequency. Click on the Connect button. A back and forth of short transmission and listening should occur.
The window where ardopc is running displays the decoding PEAK every 10 seconds. The value should be between -20000,20000 and -25000,25000. You set this with the recording audio level (on your sound card).
Also check the audio volume during transmissions using the power meter on your transceiver.
The black window at the bottom of the Pat web page also serves as a console.
If a gateway does not respond, do not hesitate to try another one. Getting a connection is not easy, you have to persevere!